
Premium
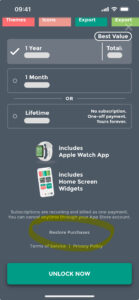
On the purchase screen, please scroll to the very bottom and tap on “Restore Purchases”.
What? Why? How?
No matter if you call it mood tracker, mood journal or mood diary – it’s the same idea. We’ll just stick to the term “mood diary” here.
A mood diary as a tool to capture one’s mood in a structural way for the purpose of reflection, analyzation and understanding. Just like in a simple diary, you capture thoughts, emotions, feelings and – of course – moods. Since it is done in a structural way, it potentially lets the writer gain more precise insights into thoughts and behavioural patterns. A mood diary creates the foundation for change and taking control of one’s life. It is not just used during therapy of bipolar disorders or depression. It is often also used in coachings and for self-improvement.
To get started, all you need is just a pen & paper and the basic structure (e.g. mood categories/scale). But if you want to take mood tracking to the next level you should take a look at our low-effort mood diary app Moodistory. 🙂
A mood diary is a great tool to cultivate positivity, gain inner strength and raise awareness about your mood, emotions and feelings. It helps you taking control of your life especially when your world feels to be in chaos. But it is also a very efficient tool when it comes to self-improvement as it allows you to see yourself from a new – more distant – perspective and in this way makes changes in your patterns of thought possible.
If you think about yourself right now – can you answer the following questions:
How were you doing last week, last month or a year ago? What did you do when you were feeling good? What did you do when you didn’t feel good? Is your mood following a pattern? Do you have mood swings? Do you know how long your lows and highs usually last? What were you thinking when you were down?
A mood diary can answer all of these questions in great detail. If you want to know more about the benefits of keeping a mood diary, head over to our blog and check out our “10 reasons why keeping a mood diary is great“.
This strongly depends on the tool you use to keep your mood diary. Our app Moodistory was designed to keep the effort as low as possible while capturing as many details as possible:
Entering one simple entry will take you about 5 seconds in our app (yes, seconds!). If you are entering an extensive entry, it will take you a little bit more – you just need to tap on icons (e.g. running, shopping, party etc.) that describe your day. No need to write anything down (even though you can do this too)! It’s fast and easy. Of course, you can also create your own icons – this is also just a matter of seconds. Moodistory can also capture your location automatically!
We’ve performed user tests to measure the time to creation. On average, users need 20 seconds to create an entry. So, you just need to spend 20 seconds a day on your mood diary – it’s less time than making a sandwich, less time than brushing your teeth and probably even less time than booting up your favourite video game!
As a rule of thumb, we recommend to create at least one entry per day.
In general: the more information about your mood is present, the better and more concrete are the insights you will get. Therefore you should ask yourself two questions:
1) What is the best time to answer the question “How are you?”.
This could be for example in the morning or in the evening. In fact, a lot of people prefer to create an entry in the evening just before going to sleep as it is a good time to reflect on the passed day. But since you can create as many entries per day as you would like to, you could also plan to create an entry in the morning and at noon and in the evening. No matter how often you are planning to create entries, we strongly recommend to set up one or multiple reminders, so you will never forget to create an entry.
2) Do you think that your mood changes a lot during the day?
If you answer this question with “yes”, we recommend to create more than 1 entry per day as you will then get a much more detailed picture of the past. You can e.g. set up reminders for every 4 hours.
Another approach is to create an entry every time you feel a shift in your mood. This way it will be much easier to understand why your mood has changed.
Using Moodistory
Yes. You can create as many entries per day as you like.
The easiest way to do so is to tap the “+” icon in the lower right-hand corner of the screen and select “Any Day / Time”. You will then have to select the date for your new entry and after that the time.


Alternatively, you can also open the calendar, and tap any day twice to create an entry. If a day is already colored (meaning an entry has been created for that day), then you just need to tap the plus button in the upper right-hand corner of the daily view.
Yes, of course. You can change any property of any entry: the date/time, the location, the mood, the list of selected events, the notes and of course the image.
Just open any entry and tap on the pencil icon that is located on the very top right.

Now tap on the item that you would like to change (e.g. the smile to change the mood). If you want to edit the notes, just scroll down to the notes field and tap on it.

If you would like to delete an entry, scroll to the very bottom and tap on “Delete answer”.

Events are anything that you feel are important to you/your mood and that determine your day. They can typically reflect your day-to-day routine and are often referred to as “activity”. If can be anyting like e.g.: the food you had, the sports you did or the fact that you have been to work. You can also think of events as things that you would use as hashtags and feels important to you and your mood.
There are more than 180 predefined events divided into 10 categories in Moodistory that can be fully customized. Meaning you can edit & delete existing events and you can also create completely new events and categories.
For your convenience, there are 2 ways to create new events:
1) During the creation of an entry on the event selection screen.
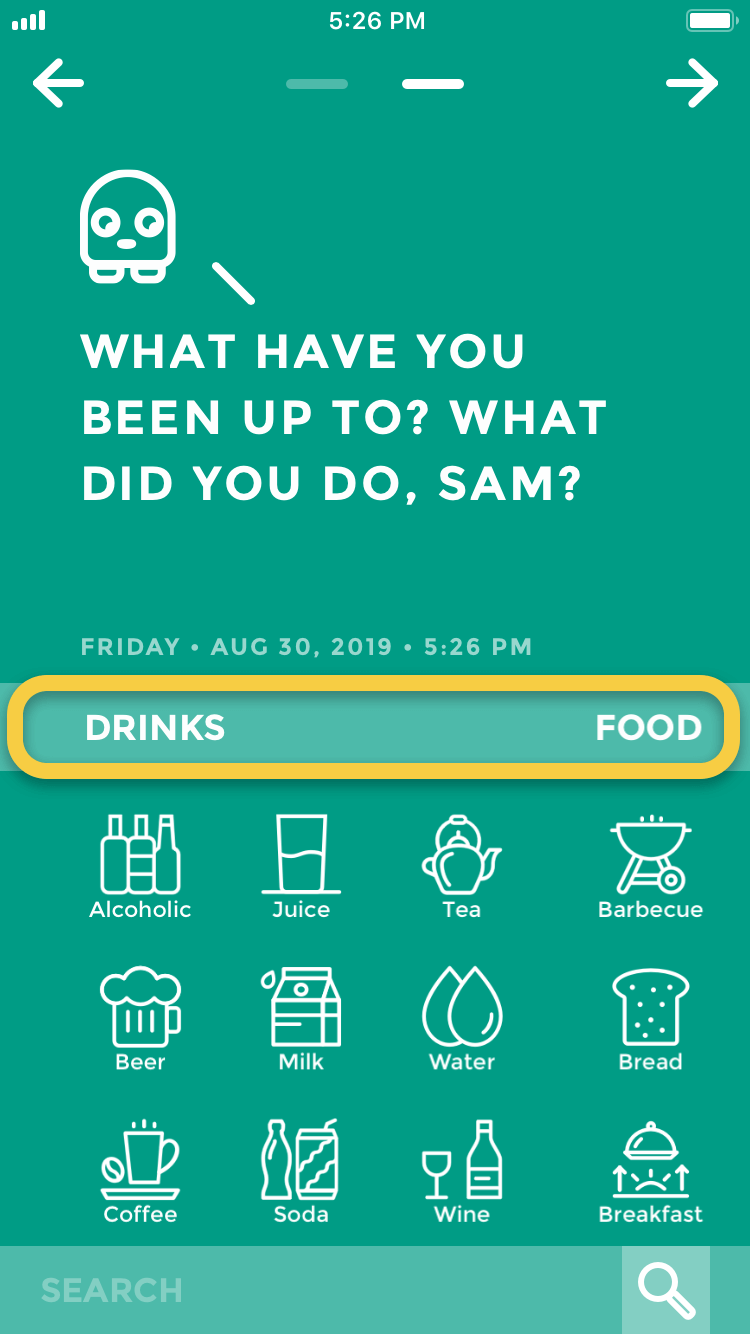
If you search for an event that does not yet exist, you will see a plus shaped icon with the title “Create …” (see screenshot below) and a “+”-Symbol in the search bar. Once you tap on any of these icons, the screen for creating a new event pops up. The newly created event will be automatically selected.

2) Using the settings menu:
Go to settings (very left button in the navigation bar on the bottom), tap on “Events List & Categories”, and then select “Edit Events List” (see screenshots below). Then tap on the button “Add New Event” to create a new event.


It’s important to know that you can also create (and of course edit and delete) event categories too. On the “Events List & Categories” screen, select “Edit Event Categories” to manage categories. Tap on “Create Category” to create a new one. (Note that you can change the order too using the icon in the upper right-hand corner.)


Go to settings (very left button in the navigation bar on the bottom), tap on “Events List & Categories”, and then tap on “Edit Events List”. You will then see the list of all available events in Moodistory.
Now look for the event you want to edit/delete (you can also use the search field on the bottom) and tap on it.

You can now change the name, category and icon of the selected event. Also, if you tap on the minus shaped icon on the top, you can delete this event completely.

Keep in mind that any changes to events will also affect entries that are currently using them. So, for example, if you use “Running” in 10 entries and delete the event, then “Running” will also be deleted from those 10 entries.
On the event/activities selection screen, tap on any category:
You will then see a list of all categories and at the very top 2 additional entries:
“Selected“: This will show you a list of all selected events/activities.
“Recent“: This is what you are looking for – tap on this. It shows you the list of your 24 recently used events/activities.

Events are intended to reflect your day-to-day routine in a catchword- or hashtag-like way.
Notes & thoughts are more about specific details about what you did, feel or think – anything that comes to your mind and you would like to remember. While events are one important cornerstone when it comes to analysing your mood, notes are not. That’s why it is crucial that you use events to describe your day-to-day routine so you can then get the most out of the statistics.
You have 2 options to create a backup of your data:
- Manual backup
- Google Drive backup (on Android) or iCloud backup (on iOS)
The manual backup saves your data (including images) to a zip archive, which you can store wherever you want. This is the way to go, if you don’t want to store any of your data in a cloud service, for the highest possible data privacy. A more convenient way is using Google Drive / iCloud backup. This will create and save a data backup directly in the cloud (even automatically if you want).
To create a manual backup, open “Menu & Settings”, select “Backups & Data” and tap on “Manual Backup”:


The manual data backup will generate a file (technically speaking, it’s a JSON file packed in a Zip-file among all images). You can store this file locally (and then send it to your computer via e.g. AirDrop or email). The filename contains the date and time of the export, so you can easily see which one is the most current one. Of course, there is also a restore feature (see screenshot above – item “Manual Restore”) in Moodistory to import your data again.
To create directly a Google Drive (Android) backup / iCloud (iOS) backup, open “Menu & Settings”, select “Backups & Data” and tap on “Easy Backup & Restore”, and select “Create backup now”:


The Google Drive / iCloud backup will save your mood diary including your images to your cloud. Here (on the 3rd screen above), you can also enable and disable the auto backup feature. The auto backup feature will regularly and automatically create backups in the background, so you don’t have to worry about data loss in case your device gets lost or stolen.
Yes, you can! Just keep in mind that you can only use the manual backup with other cloud services.
To use OneDrive, Dropbox, Nextcloud or similar, make sure to install the app of your cloud service provider and log into your account. You can then enable your favorite cloud service in the ‘Files’ app and use it in Moodistory. Here’s a detailed step-by-step description:
- Make sure that the app of your cloud provider is installed and that you are logged in.
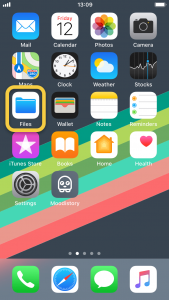
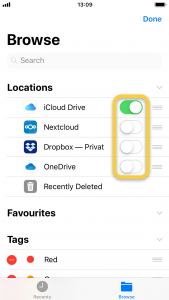
- Open the Files app.
- Tap on ‘Browse‘ (on the bottom) and select ‘Edit‘ in the upper right-hand corner.
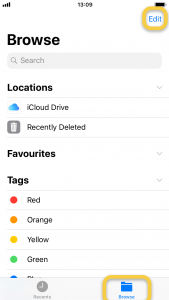
- Now, enable the cloud service that you would like to use and tap on ‘Done’ (again in the upper right-hand corner).
- All done – you can now save manual backups directly on your newly activated cloud service.


Please use the quicksave button:
Tap the page indicators at the top to reveal the quicksave hint.
Tap again to save an entry.
In other words: If you double-tap the page indicators at the top, your entry is saved right away.


Apple Watch
Please make sure that you have completed (or skipped) Moodistory’s tutorial on the iPhone.
If that is the case, please restart your Apple Watch and your iPhone.
This is usually related to the basic rules of how your iPhone and Apple Watch decide where and when a notification is shown. Please take a look at Apple’s official documentation about notifications which explains how this works and how you can change that.
Notifications (iOS)
If you don’t get any notifications according to your reminder settings, please check the following:
- Most importantly: Check if you are using the latest version of Moodistory. Please open the App Store and check if there is any update.
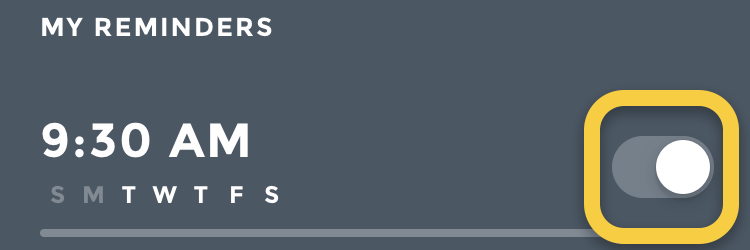
- Open Moodistory, go into the reminder settings and make sure that the reminder is set to ON.

- Tap on the reminder and check if at least one weekday is enabled.
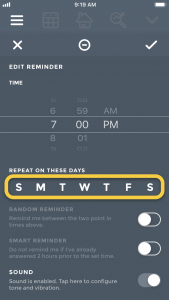
- Check if you have enabled the option for “Smart reminder”.

- If this is ON, keep in mind that if you create a journal entry within 2 hours before the reminder’s time, you will not get any notification.
- We recommend disabling the option “Smart reminder” if you are using random reminders. Why? – Because a random reminder will select a random time between the start and end time. You will never know which time is selected. If e.g. the randomly selected time is 6 pm and you create an entry at 5 pm you will not receive a notification for this day. Since you do not know that the random reminder was scheduled for 6 pm, it is hard to tell why you did not get a notification.


If all of this seems fine, please check your notifications settings:
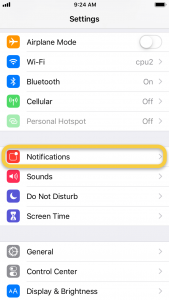
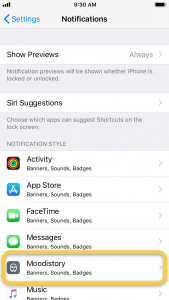
Open your iPhone’s ‘Settings’ and select ‘Notifications’. There’s a list of apps at the bottom. Please select Moodistory and make sure that notifications are ON and all screens are enabled.


Usually, the reason for not hearing any sounds for notifications is a general configuration setting on your iPhone. But just to be sure, please first check your reminder configuration in Moodistory:
- Open Moodistory, go to the reminder settings and select the reminder for which you are missing the sound.
- Check if the option for Sound is ON.

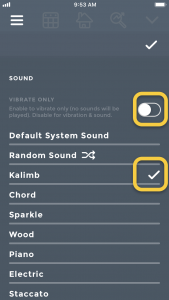
- Tap on Sound and make sure that the option “Vibrate only” is set to OFF and one of the sounds in the list below is selected.
- Now save the sound settings and the reminder: On the sound settings screen (see the previous step), tap the checkmark in the upper right-hand corner to go to the previous screen. Now, tap again on the checkmark in the upper right-hand corner to save the reminder.


Let’s continue to your device’s settings to check whether it is configured to play sounds for notifications:
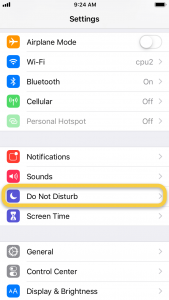
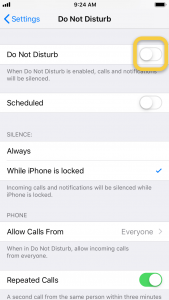
- Open your iPhone’s ‘Settings’ and select ‘Do Not Disturb‘. Make sure that the very first option ‘Do Not Disturb’ is OFF.
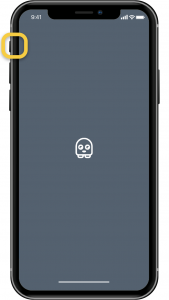
- Make sure that your device’s hardware mute switch is NOT set to silent. The switch should be in the upper position, meaning you should NOT see the red-orangish color if you look at the switch from the side.
- Open your iPhone’s ‘Settings’ and select ‘Notifications’. There’s a list of apps at the bottom. Please select Moodistory and make sure that the switch for sounds is set to ON.

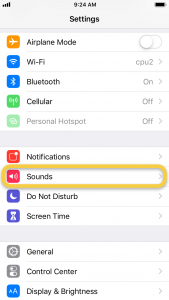
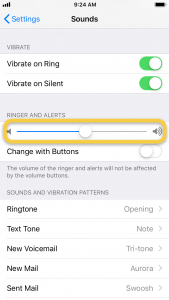
- Check your notification sound volume: Again, open your iPhone’s ‘Settings’ and select ‘Sounds’. The slider for ‘Ringer and alerts’ controls the notification sound volume. Slide it up to at least the middle.


Notifications (Android)
There can be multiple reasons why reminders/notifications are not working. The root cause is usually a system setting, which we will go through together in this FAQ:
- Allow notifications: Please make sure that you are allowing Moodistory to send notifications: Open your device’s settings and find the list of apps. Choose Moodistory. Look for a menu item called ‘Notifications’ and make sure this item is set to ‘Allow notifications’.
- Battery Optimization: While the basic idea of optimizing the battery duration is great, sometimes they prevent notifications to appear. Please allow Moodistory to run in so-called ‘Unrestricted’ mode:
Open your device’s settings and find the list of apps. Choose Moodistory. Now, you should have a menu item called ‘Battery’ or ‘Battery saver’. Tap this and activate ‘Unrestricted’ or ‘No restrictions’. - Are you using a Xiaomi device? If so, please add Moodistory to the ‘Autostart’ list: Open your device’s ‘Settings’, select ‘App’, then tap on ‘Permissions’, tap on ‘Autostart’, and then please enable the switch for Moodistory. To give you some background information: On Android in general, notifications must be rescheduled after a system restart. Some Android devices (such as Xiaomi devices) prevent this by default (except for the well-known apps such as WhatsApp etc.). So by enabling the switch for Moodistory in the Autostart setting, you make sure that after a system restart, reminders will be rescheduled.
- Please make sure that you don’t have the “Do not disturb” mode activated. You can either search for “Do not disturb” within your system settings. Depending on your device, you should find that setting either within the “Sounds and vibration” or within the “Notifications” menu item of your device’s settings.
- Last but not least, please make sure that the reminders within Moodistory are correctly configured.
Please disable “Smart reminders” for now, since this may also be (a fine) reason why a reminder did not show.
CSV Export
The CSV export will let you use your mood data with other programs such as Google Sheets, Microsoft Excel or Apple’s Numbers. This means that you can do your own analysis of the mood data.
The CSV export will create a so called ‘Comma-Seperated Values‘ (CSV) file. This file is a simple text file that you can open with any app or program that can show texts. For more information about CSV files, see next FAQ.
Roughly speaking, a CSV file is a simple text file that holds data in a structured way (CSV stands for Comma-Seperated Values). Since it’s a simple text file that you can open them with any app or program that can show texts.
The structure of such a CSV file is easy to understand: You can think of it as a kind of spreadsheet where columns are separated using a comma. The first line of the CSV file describes the name of the columns. All other lines are the data, meaning every single line holds the data of one diary entry.
Here’s an example of a CSV file:

At first sight it looks a bit crowded, but it gets clear if you read it word by word:
The first column is named ‘date’ and has 2 values, ‘2021-09-16 10:34:50’ for the first line and ‘2021-09-15 19:00:00’ for the second line.
The second column is named ‘mood’ and has 2 values, ‘3’ for the first line and ‘5 for the second line.
Etc.
Moodistory supports not just the export of mood data into a CSV file, but also the import of mood data from a CSV file. Find out more, please keep reading the FAQs for “CSV Import” and have a look at the section for “CSV Export”.
The CSV export screen lets you choose 2 options:
 Excel friendly CSV export: If you are going to create the CSV file to be used in Excel, then we recommend setting this option to ON. Excel has its own special way of handling CSV files. For example, line breaks are sometimes not handled correctly, resulting in a misaligned spreadsheet. If you are rather going to use the CSV file in Google Sheets or Apple’s Numbers, then we recommend setting this option to OFF.
Field delimiter: By definition, a CSV file should use a comma to separate fields. However, not all programs stick to this definition. Only if you know that you need a semicolon instead of a comma, change the default setting.
Let’s take a look at a sample CSV file:
A diary entry in the CSV file is described using 8 columns:
date: The date and time of the diary entry. Format used: yyyy-MM-dd HH:mm:ss
mood: The mood of the diary entry. The mood is described by a number in reference to the used mood scale. Here’s an example: If we have a mood scale of 6, meaning we have 3 negative and 3 positive levels, then a mood in the CSV file is described by a number between 0 and 5 (not 1 and 6). – 0 stands for the most negative mood, 5 for the most positive mood.
events: The list of events of the diary entry. Every single event within the CSV file is described by the assigned category and the event name – e.g.: Drinks-Coffee. Since there can be more than one event per diary entry, events are separated using the “|”-sign.
notesAndThoughts: The text stored for notes and thoughts of the diary entry. If you set the option “Excel friendly CSV export” to ON, then line breaks are replaced with the “#”-sign.
locationName: The location name as text stored for the diary entry.
locationLatitude, locationLongitude: The location’s latitude and longitude coordinates. These can be used on any map to find the exact location.
hasImage: Since CSV files can only hold texts, images cannot be written to them. However, this field indicates whether an image is attached (value “yes”) or not (value “no”).
Excel will let you open CSV files directly, and then split the data into columns, but there is a better and more safe way:
- Create a new workbook (meaning, create a new Excel file)
- Go to the Data tab and select on the very left From Text
- Select the CSV file to be imported
- Now, it’s important that you set the configuration right:
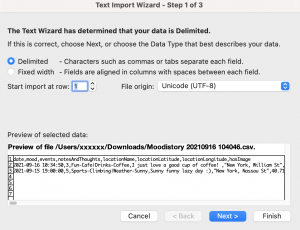
- On the first screen, make sure that you have selected ‘Delimited‘, ‘Start import at row‘ is set to 1, and ‘File origin’ is set to ‘Unicode (UTF-8)‘. If everything is set, it should look similar to this:
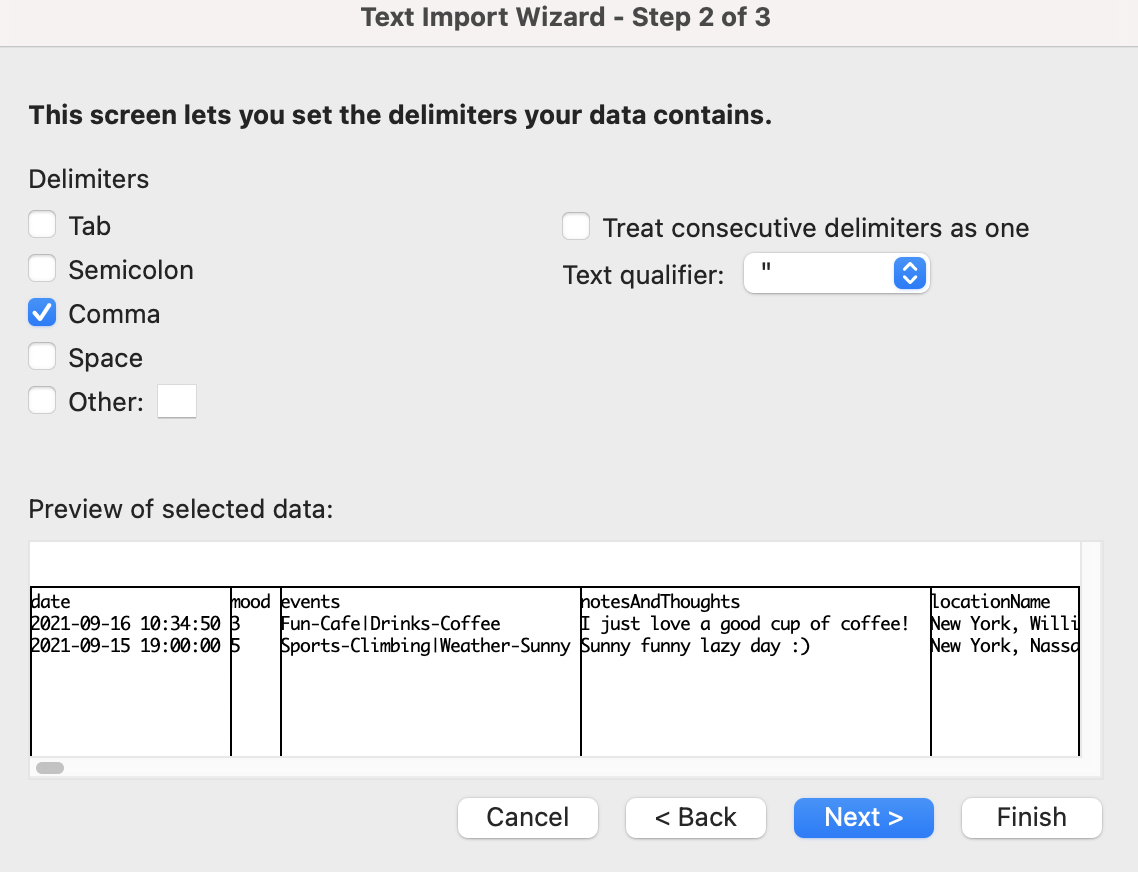
If it looks correct, click on Next. - Now you need to tell Excel which delimiter you are using. It has to be the same as the field delimiter that you have used for the CSV export. If you’ve used the default settings, ‘Comma’ is the correct option to choose here:

Once you’re done, tap on Next. - Now you can tell Excel, which type of data (date, text etc.) every single column holds. We recommend setting the first column (date) to the structure YMD. Make sure that you first select the column at the bottom, and then select the column data format. Leave all other columns unchanged.
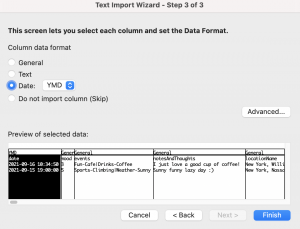
Do not yet click on Finish. Before you do so, click on ‘Advanced…‘ and make sure that the ‘Decimal separator‘ is set to a dot “.” and the ‘Thousands separator‘ is set to the apostrophe.
Now, close the advanced window and click on ‘Finish‘
- On the first screen, make sure that you have selected ‘Delimited‘, ‘Start import at row‘ is set to 1, and ‘File origin’ is set to ‘Unicode (UTF-8)‘. If everything is set, it should look similar to this:
- All set, you can now start analysing your mood data in any way you can think of!


CSV Import
Have you collected mood data in a spreadsheet? Are you considering switching from another app to Moodistory? – Then the solution for all of this is the CSV import.
The CSV import lets you import mood data from other programs such as Google Sheets, Microsoft Excel or Apple’s Numbers or any other app or program that can create a CSV file. A CSV file is therefore a file format that is used to transfer data from one app or program to another. See this FAQ for basic information about CSV files.
First, you are going to need a suitable CSV file. The requirements for a CSV file are straight forward. Please see FAQ What’s the required structure of a CSV file, so it can be imported into Moodistory? for more information.
Once the CSV file is ready, put it on iCloud or copy it to your device.
Now, open Moodistory and navigate to “Menu & Settings” → “Data” → “Import from CSV“.

Tap on “TAP TO SELECT FILE” and select the CSV file that you would like to import.
Moodistory will now validate the CSV file.
If the validation was successful, you will see a screen similar to the following:
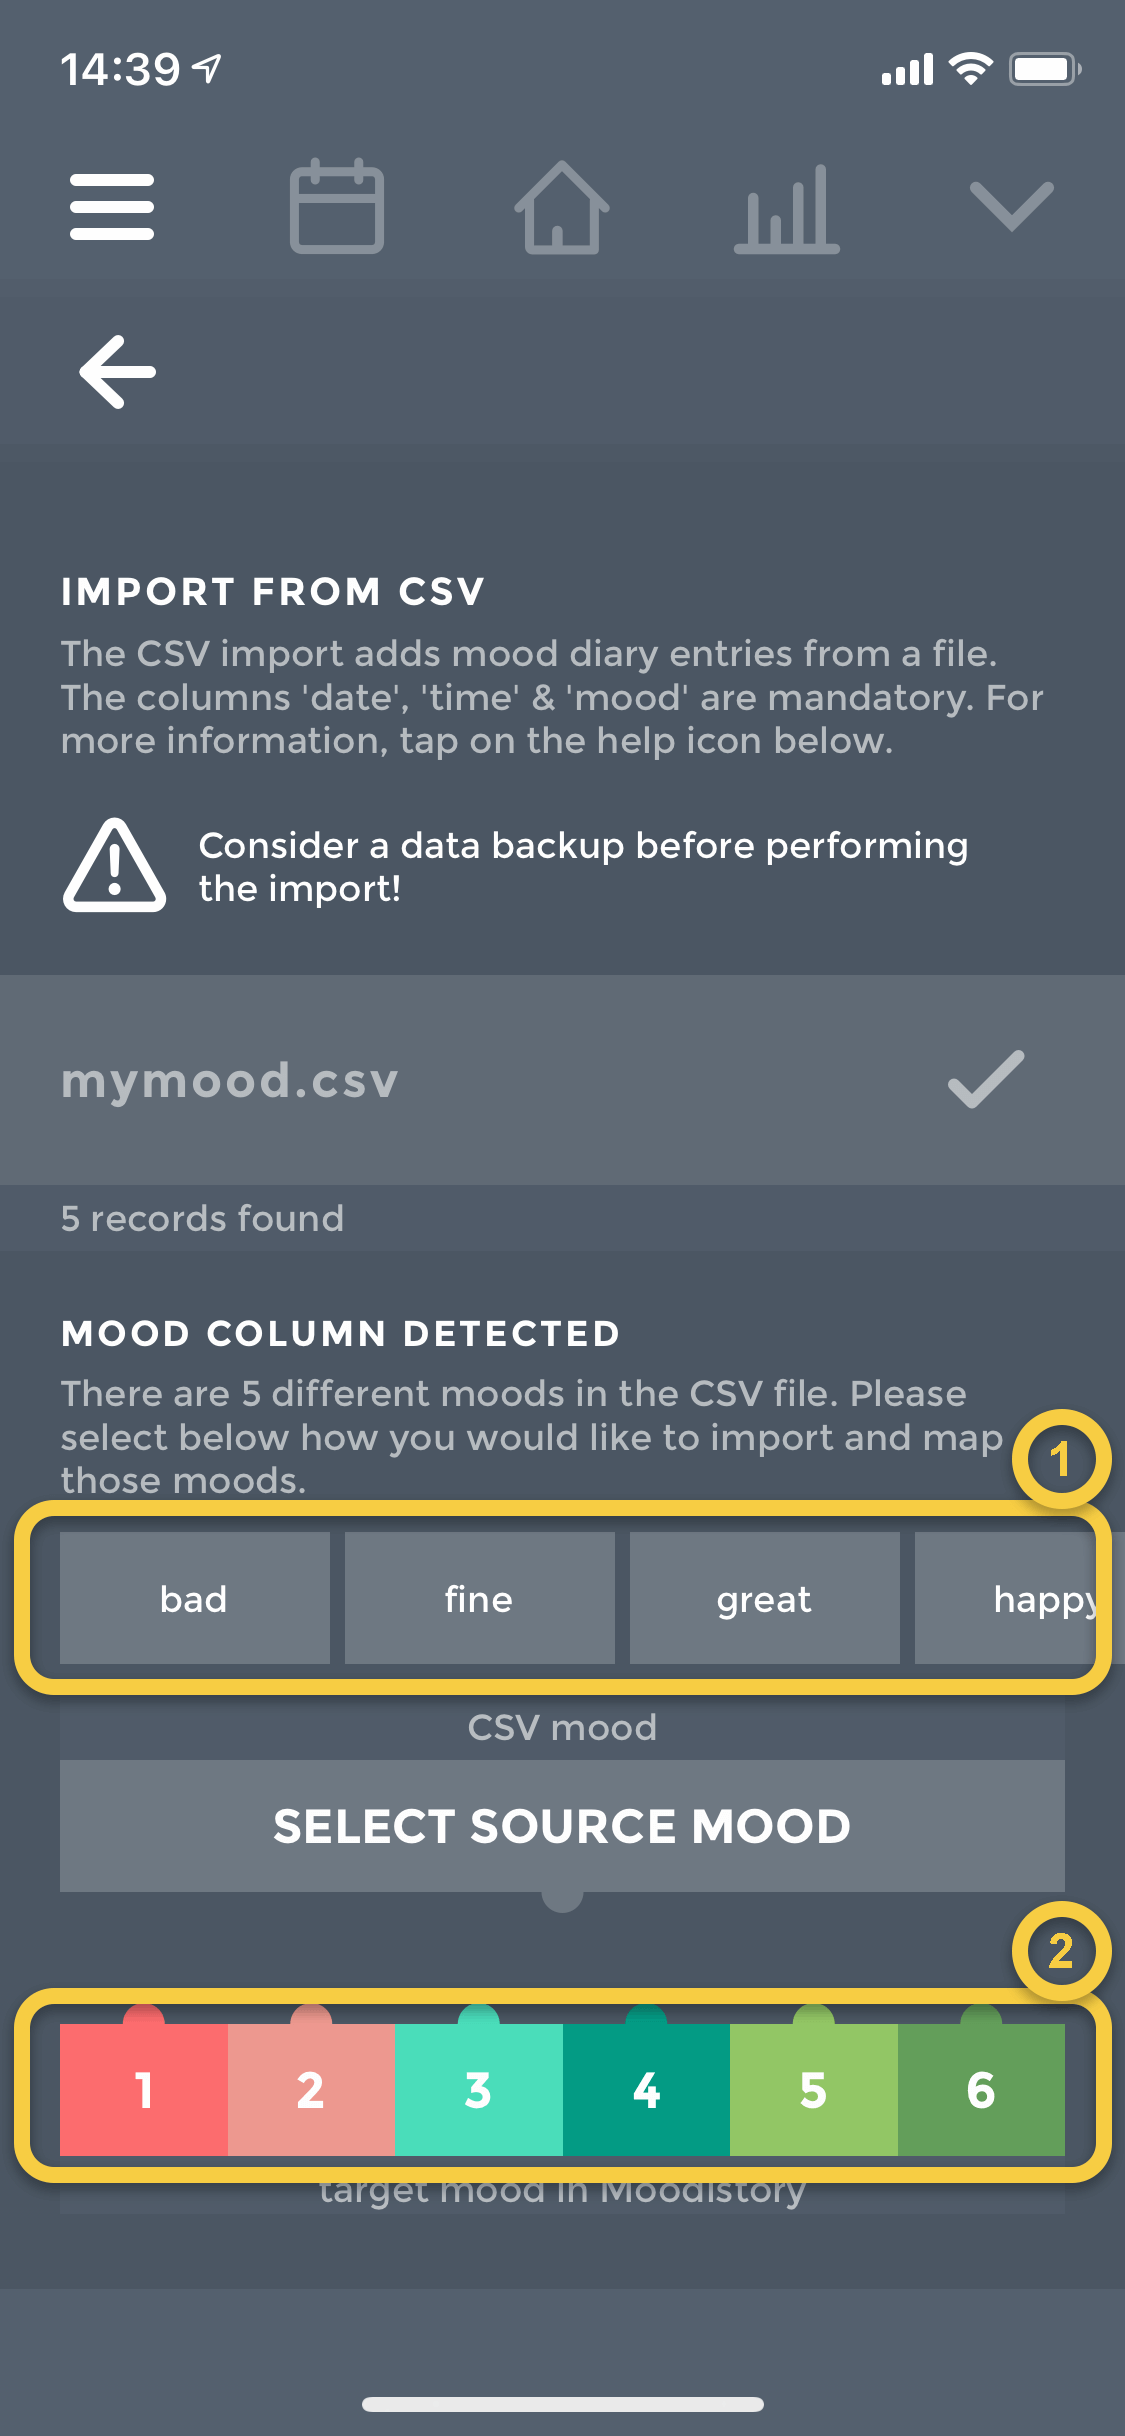
There is a horizontal list of all moods (see screenshot item 1) which were found in the CSV file. This list is sorted alphabetically and can be scrolled horizontally. All you have to do is select one mood after the other and tap on any of the target moods in Moodistory (see screenshot item 2). For example, tap on “bad” and then tap on “1” (below). Once all moods have a target mood mapped, you are ready to perform the CSV import.
But there’s more you can do: If you scroll further down, you can choose which additional columns should be copied into the “Notes & Thoughts” field within Moodistory (see item 1 in screenshot below).
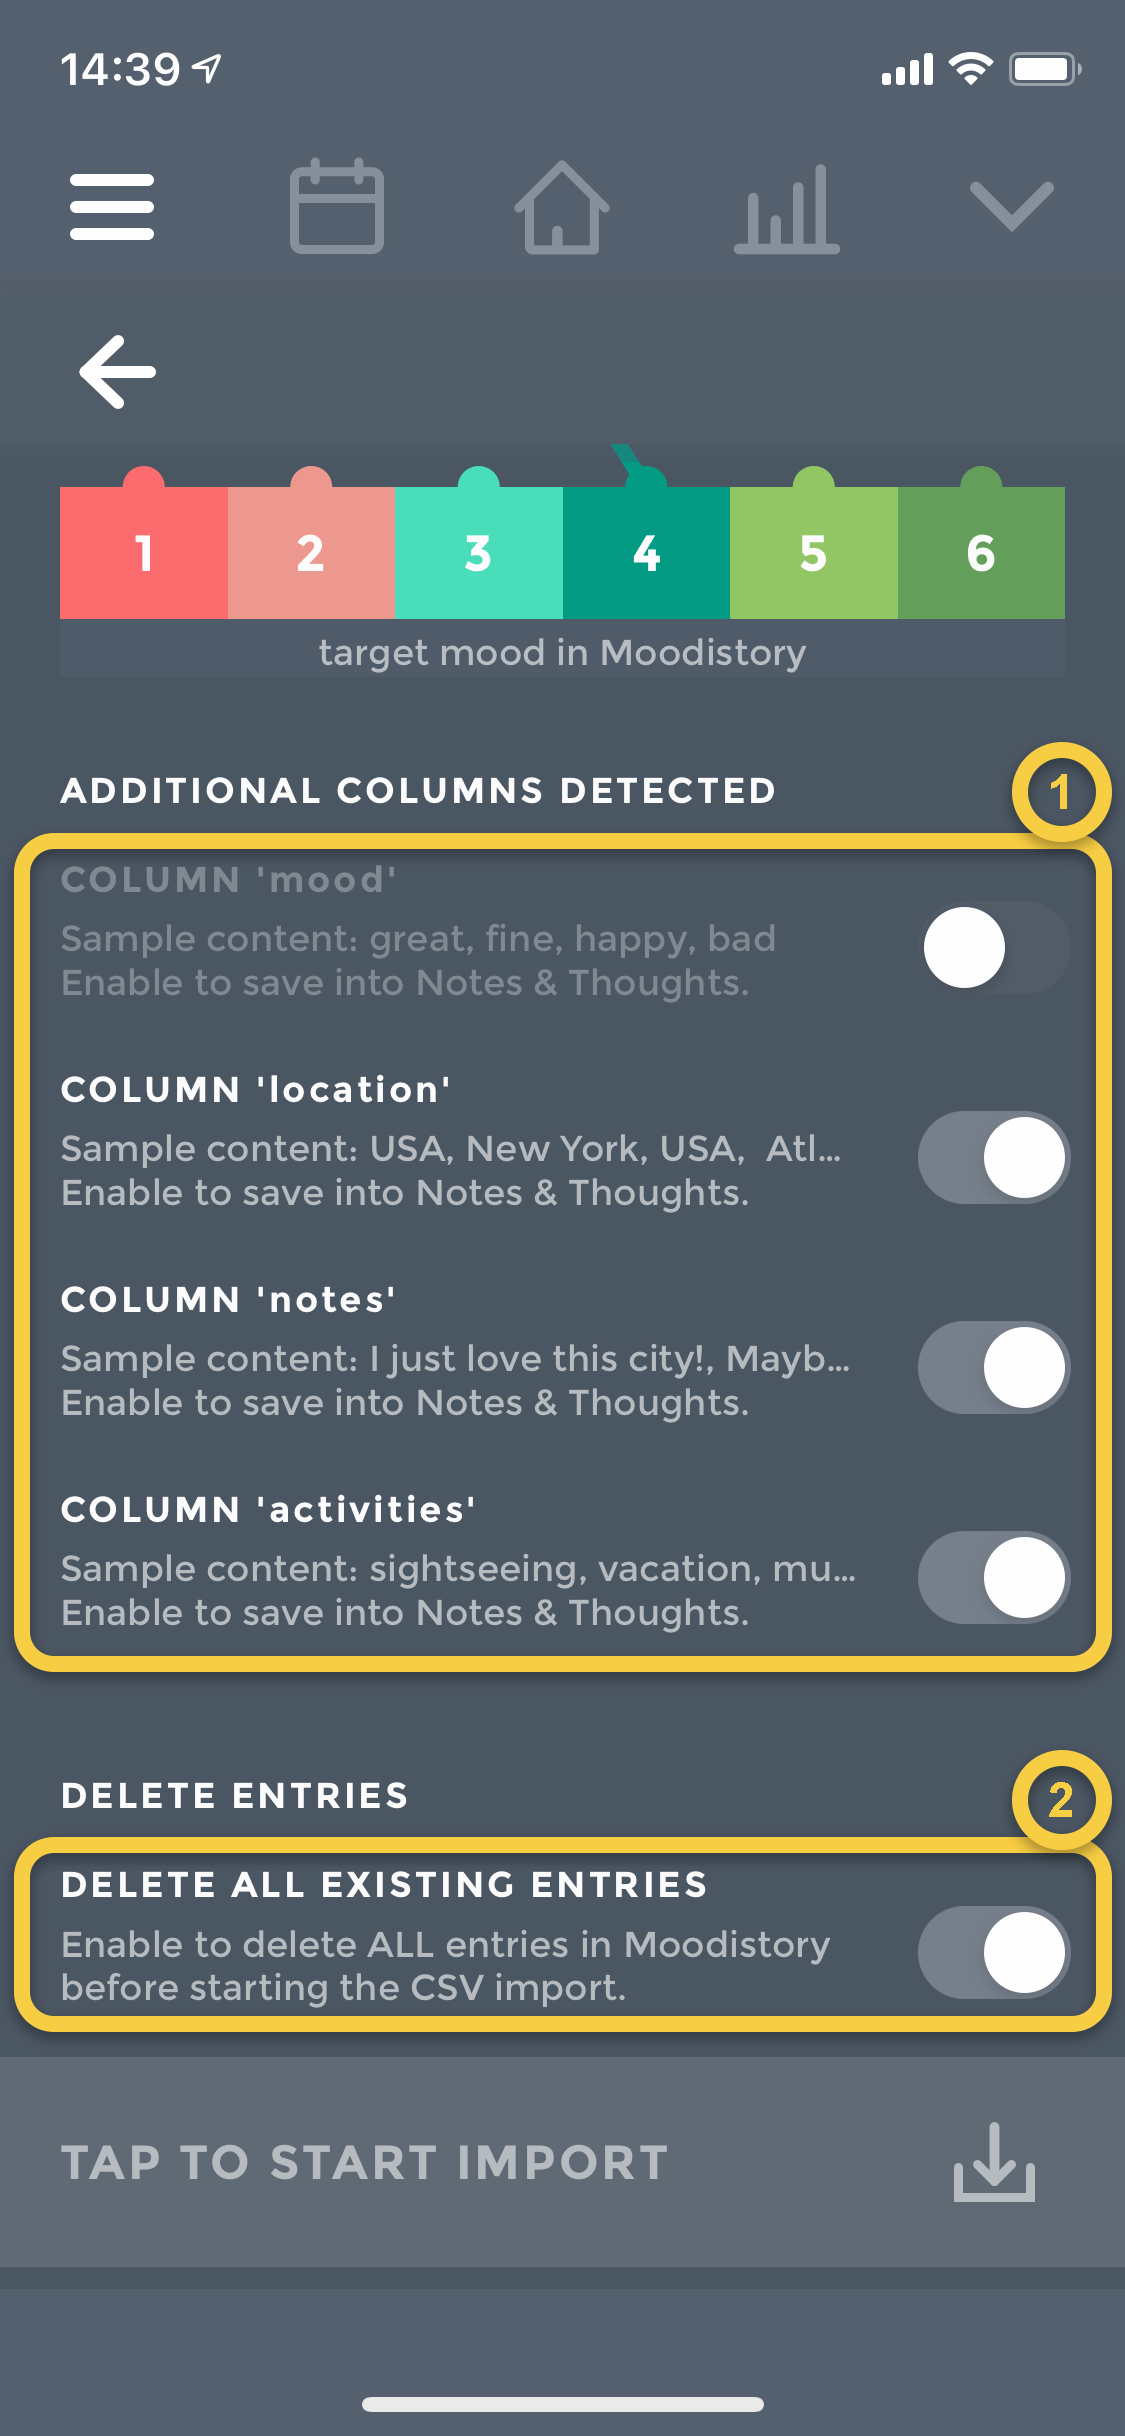
Here, for example, the content of location, notes, and activities are imported into the “Notes & Thoughts” field.
Last but not least, there is a switch for “Delete all existing entries” (item 2 in screenshot above). Be careful with this because – if activated – it will delete all currently existing entries within Moodistory before performing the CSV import.
Ok, now you are ready to perform the CSV import. Just tap on “TAP TO START IMPORT” and – voilà – you’ve imported your mood data into Moodistory. 🎉
Usually, apps have a feature that lets you export data into a CSV file (often referred to as “CSV Export”). This is needed to use Moodistory’s CSV import. If you have such a file from your old app, simply go ahead and try to import the CSV file directly into Moodistory:
Open Moodistory’s “Menu & Settings” → “Data” → “Import from CSV” and follow the on-screen instructions. There is also a FAQ that explains every single step in detail: What are the steps to perform the CSV import?
The CSV import will always first check the structure and content of the file before making any changes in Moodistory. If something is not as it should be, you will immediately be notified. If this is happening (e.g. because the date format is wrong), you can simply open the CSV file in any text editor, in Google Sheets, or in Excel, then perform the changes, and run the import again.
The basic rules for a valid CSV file are described in the FAQ What’s the required structure of a CSV file, so it can be imported into Moodistory?
Good to know: If you need to make changes to the date or time format, the following FAQs may be of interest to you:
I have my mood data in Excel – anything I need to prepare for the import into Moodistory?
I have my mood data in Google Sheets – anything I need to prepare for the import into Moodistory?
A note about Excel: As mentioned earlier, CSV files can be opened with programs such as text editors, Microsoft Excel or Google Sheets. It’s important to know that Excel has its own way of reading and interpreting CSV files. There are a few things which are good to know – please read through FAQ How can I use a CSV file in Microsoft Excel? if you are going to use Excel to change CSV files.
TL;DR: There are 3 mandatory columns (date, time, mood), more columns are allowed.
Example CSV file having mandatory columns only: sampleMinimal.csv
Example CSV file having mandatory and additional columns: sample.csv
If you’re having troubles creating a valid CSV file, please check the following rules:
1) Columns must be separated with a comma (,) or semicolon (;)
2) The first row must hold the column names
3) Every row must have the same number of columns (empty columns are allowed)
4) 3 columns must exist: date, time, mood
5) Android only: If you want to import events or activities, an additional column with the name “events” is needed:
Events need to be separated with a “|”. If you want to use categories, add a dash (“-“) between the category name and the event name.
Example for events with categories: “Food-Bread|Drinks-Water|Sports-Tennis”.
Example for events without categories: “Bread|Water|Tennis”.
6) The column date must follow the format: yyyy-MM-dd (4-digit year, 2-digit month, 2-digit day)
7) The column time must follow the format: HH:mm:ss (24h format having: 2 digit hours, 2-digit minutes, 2-digit seconds)
8) Column names must not contain spaces and must only use characters or numbers. E.g. “column 1” is not allowed; “column1” is fine.
9) Text should be put between double quotes – e.g. “Hello there, I’m a text”. If you don’t do this, it may still work, but double quotes are safer.
10) Do not use spaces between columns – e.g. do not use “column1, column2, column3”, instead use “column1,column2,column3”
Yes, you need to make sure that
1) the first line of the spreadsheet holds the column names.
2) columns “date“, “time” and “mood” exist.
3) date values use the format “yyyy-MM-dd“. You can change the format by selecting all date cells, right click -> Format Cells -> select “Date” -> select the one matching the requirements – e.g. 2012-03-14.
4) time values use the format “HH:mm:ss“. You can change the format by selecting all time cells, right click -> Format Cells -> select “Time” -> Select the one matching the requirements – e.g. 13:30:55 (24h time format including seconds).
If everything looks fine, you can save the sheet using “Save as” and choose for “File Format” the option “CSV” (sometimes also referenced as “CSV UTF-8 (Comma delimited).csv“).
Now you just have to copy the file to your iCloud or your device running Moodistory, and you’re ready for import.
Yes, you need to make sure that:
1) the first line of the spreadsheet must hold the column names.
2) columns “date“, “time” and “mood” exist.
3) date values use the format “yyyy-MM-dd“. You can change the format by selecting all date cells -> choose “Format” at the top -> select “Number” -> “Custom date and time” and select the date format that matches the requirements – e.g. 1930-08-05. Make sure to use leading zeros for day and month.
4) time values use the format “HH:mm:ss“. You can change the format by selecting all time cells -> choose “Format” at the top -> select “Number” -> “Custom date and time” and select the time format that matches the requirements – e.g. 13:30:30. Make sure to use leading zeros for hour, minute and second.
If everything looks fine, you can save the sheet using “File” -> “Download” -> “Comma Separated Values (.csv)”.
Now you just have to copy the file to your iCloud or your device running Moodistory, and you’re ready for import.
Privacy
Simply: On your device, and only on your device. There is no automatic sync into any cloud service. We do not store any of your mood data on any server. Everything is saved ON your device.
That’s why we say: Your data belongs to you!
No, we do not share any of your mood data with any other app or website.
No one but you has access to your diary. Just like it should be with any other diary.
 Yes. Moodistory supports your device’s Face ID / Touch ID / Passcode to restrict access.
Just go into Moodistory’s settings and enable “Touch ID / Code” or “Face ID / Code” or “Lock” (depending on which device you use).
Once enabled, Moodistory will ask for your Face ID / Touch ID / Passcode / Unlock pattern when opening the app and before anything else is shown on the screen.
Is your question not here?
If your question is not answered here, please do not hesitate and send it to us. We’ll get back to you as soon as possible. Thank you!